
The idiom, garbage in, garbage out applies to many areas of scientific research, including flow cytometry. Good sample preparation is critical to accurate and sensitive cytometry analysis of cells, wherever their origin.
What are the key features of quality samples for flow cytometry analysis?
First, preparing samples with high cell viabilities is a good foundation. Dead cells can bind labeling reagents such as monoclonal antibodies and nucleic acids indiscriminately, and this can lead to high background signals and false-positive readouts of surface and intracellular biomarkers. Although viability dyes can be used to gate out dead cells, starting with a sample preparation with high viability certainly helps reduce any misleading signals from any dying cells within your sample.
A second key feature of good sample preparation for flow cytometry is homogeneously suspended particles. Minimizing clumping helps to keep your flow cytometer running cleanly and reducing the number of cell-doublets that are removed during gating, can help ensure the accuracy of your detected signal and maximize event acquisition.
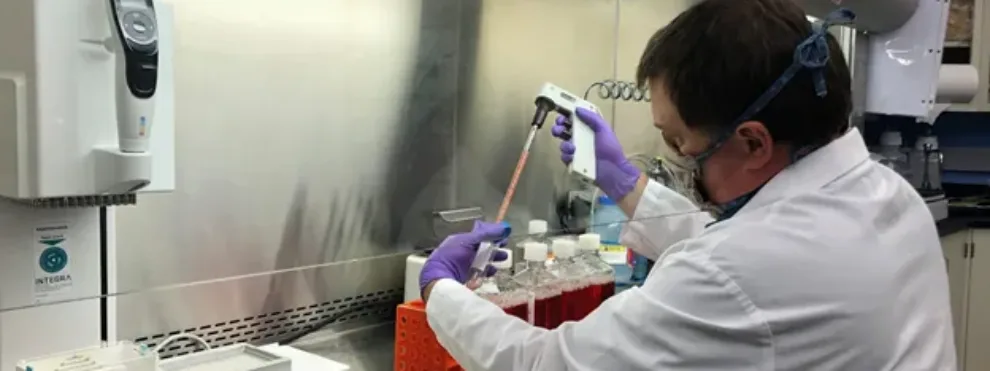
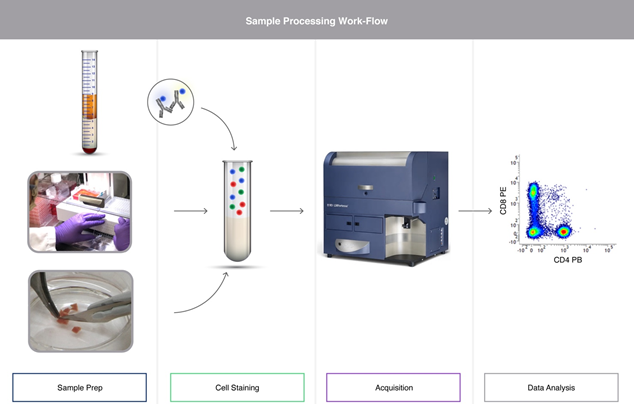
Sample preparation also involves the optimization of sample staining. At KCAS Bio, we titrate all of our staining reagents to ensure optimal signal to noise ratio for our cell types of interest. And we frequently include cell count beads within our samples to ensure that a sufficient number of events are collected in order to provide statistically significant data for the cell type(s) of interest.
Here we describe the unique considerations for sample preparation based on the type of sample and the application that it is being used for.
Key considerations for whole blood samples
For most clinical applications, fresh whole blood is the sample of choice, but even beyond that, there are several considerations. It is important to select the appropriate anticoagulants for your experiment since the type of anticoagulant used can affect expression patterns of biomarker staining and sample stability (Karai et. al. 2018). EDTA is the anticoagulant typically selected for Complete Blood County (CBC) and White Blood Cell Differential by flow cytometry.
But, there are numerous examples of suboptimal CD marker staining in samples collected into EDTA, including CD11b (Repo et. al. 1995), and since EDTA binds calcium, it may impact conformational epitopes of a number of markers such as CD41, CD44, and CD49d, and is therefore typically not the anticoagulant of choice under these circumstances. Other commonly used anticoagulants include sodium heparin and acid citrate dextrose (ACD).
These all have different stabilities – Sodium Heparin and ACD samples are reported stable for up to 72 hours, whereas EDTA sample stability is determined to be 48 hours (Davis et. al. 2013). Any flow cytometry lab should conduct its own validation in order to determine sample stability for any given study.
Shipping conditions for whole blood samples
The shipping conditions for whole blood should also be considered, and we see higher PMBC recovery from whole blood shipped at ambient temperature compare with 4˚C on ice packs. Avoiding as much mechanical stress and shaking as possible is also recommended, and for platelet activation studies, this is critical.
It is recommended that blood samples be processed as soon as possible, and it is well recognized that delayed processing of whole blood on density gradients such as Ficoll™ can result in cell loss, and granulocytes may end up contaminating the mononuclear cell layer (Diks et. al. 2019).
Hypotonic cell lysis (with NH4Cl, Diethylene glycol, etc.) is often employed to remove RBCs but it can also incur cell and epitope loss by affecting WBC plasma membrane integrity. One way to avoid the need for this step is to stain the whole blood for CD45+ and set the threshold on CD45+ to eliminate the RBC analysis.

Sample fixation
Lastly, there are many commercial lysis buffers now available with and without fixatives for the processing of whole blood. There are many benefits to sample fixation – it allows samples to be run whenever convenient, providing a safety net since the sample is preserved and any infective agents (such as blood samples from HIV-infected patients) are neutralized, enabling safer handling.
There are two main mechanisms for fixation:
- With alcohol, which denatures proteins
- With aldehydes that cross-link lysine residues and generally provide superior epitope preservation
Fixation methods can also be combined. For example, a sample may be fixed initially with formamide to lock everything in place, and then treated with ethanol and/or Triton X-100 or Tween-20 to produce larger holes for antibody conjugate access for intracellular staining.
Additional considerations for fixation
Whatever your fixative, it is always good practice to vortex or mix while adding it to your sample. This ensures good penetration into the cells and helps to reduce cell clumping. For flow cytometry protocols that combine surface and intracellular staining, there are several options for where the fixation step is implemented. Analysis of phospho-targets can be altered by the binding of staining mAb to the surface markers, generating artifact phosphorylation signal. In this case, fixation using True-Phos™ Perm Buffer ahead of surface staining may be beneficial.
Fixation has been shown to increase the recovery of lymphocytes and monocytes, however staining patters may change with fixation, and this can depend on the clone of the mAb used for staining, so it is always recommended to validate any lyse/fixation protocol to ensure effective lysis and staining under specific reagent conditions (Stewart, J. C. et. al.).
What are the downsides of fixation?
There are also some downsides to fixation that should be considered; PE and APC are large proteins and therefore are not compatible with ethanol fixation and are also not ideal for intracellular staining. Tandem dyes such as APC-Cy7 and PE-Cy7 degrade upon fixation resulting in the emission profile of the parent dyes.
There are however formamide-stable fluorophores tandem dyes such as APC-H7 that do not have this issue, and synthetic dyes such as Alexa Fluor™ and Brilliant Violet™ perform well under fixation conditions. In any event, avoiding long term sample storage in formamide with help reduce auto-fluorescence within the sample and reduce non-specific binding. So, think through your experimental design and understand the limitations of your system.
Key considerations for the preparation of cell line samples
If your sample is a frozen cell line it is imperative to establish optimal freeze/thaw practices- thaw rapidly at 37˚C and remove the DMSO as soon as possible. And for adherent cell lines requiring EDTA or trypsin to dislodge the cells, it is important to check that epitopes of interest have not been damaged by the treatment.
Mechanical dislodging may be used under these circumstances, although this can result in cell damage and the release of DNA leading to cell clumping. Often, overnight recovery of the cells post-thaw will improve epitope expression. In all cases, it is important to optimize and standardize treatment protocols for cell line harvest for flow cytometry applications.
Key considerations for solid tissue dissociation
Solid tissues such as organs and tumors can also be analyzed by flow cytometry if the tissue is processed appropriately.
Mechanical dissociation
Mechanical Dissociation typically involves the use of a glass mortar and pestle or a blender type mechanism as with the GentleMax™ system. It is important to trim the tissue of interest during or post-surgery to remove connective tissue etc. and if the tissue is being transported, then the transport buffer/media and temperature conditions need to be optimized.
Mechanical dissociation is a rapid technique that works well on samples that are loosely associated with tissues such as mouse spleens, bone marrow, and lymph nodes, however, it can be associated with inconsistent cell yields or poor cell viability and results can vary widely between users.
Enzymatic dissociation
An alternative is Enzymatic Dissociation that employs a combination of enzymatic processes including proteolysis using enzymes such as collagenase and/or trypsin, as well as DNAses to reduce cell clumping. There are many commercially available proteases, with varying levels of potency. The goal is to disrupt the tissue structure effectively enough to maximize cell yields and viability, but without damaging epitope on the cells. This can take some optimization and may involve using a combination of different proteases.
Weakly digestive proteases include Dispase™ and Collagenase type 3, whereas Trypsin, Papain, and Elastase are strongly digestive and dissociations using these enzymes should be carefully monitored. Liberase and Blendzymes are commercial protease cocktails that are optimized for different tissue types. For complex tissue structures, it is important to understand the tissue structure in order to effectively dissociate the tissue and maximize the yield of high viability cells.
For example, the effective and efficient dissociation of the skin involves an initial treatment with Dispase™ to first separate the epidermis and dermis layers, and them collagenase to breakdown the extracellular matrix to enable trypsin to disperse the tightly associated cells including the keratinocytes and keratinocytes stem cells, the dermal derived fibroblasts and the mesenchymal stem cell-like cells.
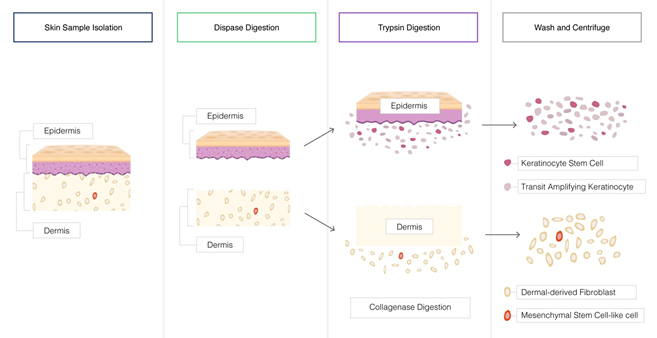
Example of enzymatic tissue dissociation – the skin tissue is a complex, structure of different cell types within two distinct layers- the epidermis and the dermis attached at the basement membrane dermo-epidermal junction. The extracellular matrix of the skin tissue is a highly complex network of proteins (collagen and elastin) organized into a network of fibers. Efficient dissociation of the skin tissue and recovery of the many different cell types involves a combination of enzymatic processes.
Dissociation of neural tissue
The dissociation of neural tissue has its own challenges due to the high levels of protective myelin. Myelin can be removed in a number of ways including on a 30% Percoll gradient (with or without a 0.9M sucrose wash) or using anti-myelin beads to remove the myelin in a simple, single-step process. Post- myelin removal, a protease such as a collagenase is often accompanied by a phospholipase in order to more completely dissociate neural cells from very lipid-rich neutral tissue.
Once optimized, enzymatic digestion can be very effective, efficient, and reproducible. However, it is important to note that enzyme dissociation can modify proteins on the cell surface, which can alter cell function or binding of fluorescent antibodies, so the process should be validated for every flow cytometry panel. For more information on enzymatic tissue dissociation, refer to this excellent resource
Finally, remember that passing your dissociated sample through a cell strainer is recommended prior to staining in order to remove cell or tissue clumps. Consider doing a pilot experiment to determine which dissociation method works best for your sample and flow cytometry staining panel.
Preparation of samples for cell sorting methods
Successful cell sorting requires a well dispersed, single-cell suspension of high viability cells. When handling adherent cell lines, frequently soybean trypsin inhibitor is used in place of FBS to neutralize and Trypsin used in cell recovery to help reduce autofluorescence of the sample.
Once harvested, the cell suspension should be maintained on ice in Ca++/Mg++-free PBS to minimize aggregation. If cell clumping is an issue, then there are several solutions including the addition of 1mM EDTA or DNase + 5mM MgCl2. Cell filtration prior to flow cytometry analysis is always recommended but is essential for cell sorting protocols to ensure no clumps are present, and the use of a live/dead stain is a must; we typically use PI, DAPI or 7-AAD.
An optimal sort buffer is low in protein to minimize autofluorescence, examples of this type of buffer include PBS with 1% dialyzed FBS or commercially available preparations. It is important to note that the high pressures involved in cell sorting can cause the sort buffer to become more basic; in this event, the addition of 25mM HEPES should help maintain a pH of 7-8. The cell density of the cell suspension will depend on the sort speed and cell type- the larger the cells, the slower the sort.
- Low Speed <5000 events per second start at 3×10⁶ cells per mL
- High Speed <20,000 events per second start at 1-2×10⁷ cells per mL
- Compensation controls and negative controls 0.5-1.0×10⁶ cells per mL
The selection of the nozzle is also based on the size of the cells, usually, we aim for a nozzle size around 5x the diameter of the cells being sorted. Adherent and fragile cells require a slower sort rate at lower pressure, and all cells should be collected into fill tubes with >1/3rd cell culture media + 20-50% FBS in order to maintain high viability.
An excellent resource for cell sorting guidelines can be found in the European Journal of Immunology Volume 47 Issue 10. Special Issue: Featuring the Guidelines for the use of flow cytometry and cell sorting in immunological studies. Oct. 2017.
So, in the end, what does this effort in sample preparation mean?
Well, good sample preparation for flow cytometry is the foundation of good experimental design. And, starting with high-quality samples will not only help to ensure the scientific quality and rigor of your data, but also help to ensure reproducibility of the data across time, and across different laboratories and research teams. When you think of your work in these terms, you can see how ultimately good experimental practices make a bigger impact than just your experiment; overtime, they will help to ensure that your flow cytometry analysis can truly support the advancement of science- and in the end, isn’t that the goal of being a scientist?
References.
Karai, B. et. al. (2018) The impact of delayed sample handling and type of anticoagulant on the interpretation of dysplastic signs detected by flow cytometry. Biochemia Medica 28(2): 020704. PMCID: PMC5898953
https://www.ncbi.nlm.nih.gov/pubmed/29666557
Repo, H. et. al., (1995) Anticoagulant Selection Influences Flow Cytometric Determination of CD11b Upregulation In Vivo and Ex Vivo. J. Immunol. Methods 185(1): 65-79. https://www.ncbi.nlm.nih.gov/pubmed/7665901
David, B. H., et. al. (2013) Validation of Cell-Based Fluorescent Assays: Practice Guidelines from the ICSH and ICCS- Part II- Preanalytical Issues. Cytometry Part B 84B: 286-290.
https://onlinelibrary.wiley.com/doi/abs/10.1002/cyto.b.21108
Diks, A. M., et. al. (2019) Impact of blood storage and sample handling on quality of high dimensional flow cytometric data in multicenter clinical research. J. Immunol. Methods. 275: 112616
https://www.sciencedirect.com/science/article/pii/S0022175919301140
Stewart, J. C., et. al. (2007). Changes in Fluorescence Intensity of Selected Leukocyte Surface Markers Following Fixation. Cytometry A. 71(6): 379-85. Doi: 10.1002/cyto.a.20392
https://pubmed.ncbi.nlm.nih.gov/17326232/